Database Maintenance
1. Preparation and Backup
Install Updates
Make sure that you are running latest version of Microsoft SQL Server 8.00.2040
(SP4). You can check version with Microsoft SQL Enterprise Manager:
- [Start] -> Programs -> Microsoft SQL Server -> Enterprise Manager
- Expand tree and select your server.
- From menu choose: Action -> Properties
- Select [General] tab and look near "Product version" part.
You can download latest service pack here:
You can get version info from "Microsoft SQL Query Analyser" with command:
-- Display
version of SQL Server.
SELECT @@version
Change User Mode
Please make sure that no one is connected to SQL Server then you are doing maintenance:
-- Display list of logged in users.
EXEC sp_who2
You need to put database into single user mode mode. Remember: In single user
mode you can have only one user logged in into database so make sure that
only one program is connected to database at the same time. It will be "Microsoft
SQL Enterprise Manager" or "Microsoft SQL Query Analyser".
Method 1 (recommended): You can do it
from "Microsoft SQL Query Analyser":
- [Start] -> Programs -> Microsoft SQL Server -> Query Analyser
- Connect to SQL server with administrative rights:
- Enter command:
-- Declare Database name
to work with.
DECLARE @databaseName sysnameSET @databaseName =
db_name()
-- Check which users
can access the database. Results will be:
-- SINGLE_USER = only one db_owner, dbcreator, or sysadmin user at a time
-- RESTRICTED_USER = only members of db_owner, dbcreator, and sysadmin roles
-- MULTI_USER = all users
SELECT DATABASEPROPERTYEX(@databaseName, 'UserAccess')
AS 'Previous
User Mode Status'
-- This command will wait 20
seconds for all remaining
-- transactions of the users to finish and then terminate them and
-- switch database to single user mode.
EXEC('ALTER
DATABASE '+@databaseName+' SET SINGLE_USER
WITH ROLLBACK AFTER 20')
-- Check which users can access
the database.
SELECT DATABASEPROPERTYEX(@databaseName, 'UserAccess')
AS 'Current
User Mode Status'
Alternative Methods: Click here to expand...
Method 2: You can do same task by using "Microsoft SQL Enterprise Manager":
- [Start] -> Programs -> Microsoft SQL Server -> Enterprise Manager
- Expand tree and select your database.
- From menu choose: Action -> Properties
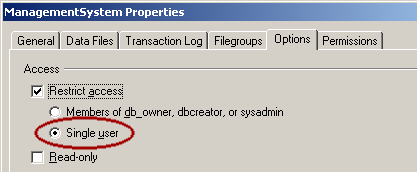
- Select [Options] tab, check-in "[x] Restrict Access" and select "(o)
Single User" and click [OK] button:
Now you are safe to do backups.
Backup DATABASE
You can do backup in three ways:
Method 1 (recommended): Do Normal Backup
with Microsoft SQL Query Analyser:
-- Check if you have backup device already
EXEC sp_helpdevice
-- Declare Database name to work with.
DECLARE @databaseName
sysname SET @databaseName = db_name()
DECLARE @backupDevice sysname
SET @backupDevice =
@databaseName+'_dev_data'
DECLARE @backupFile
sysname SET
@backupFile = 'D:\[BACKUP]\'+@databaseName+'-20060224-1200_data.bak'
-- Drop backup device
if necessary.
IF
EXISTS (SELECT * FROM
master.dbo.sysdevices
WHERE [name] =
@backupDevice)
EXEC sp_dropdevice @backupDevice
-- Create a logical
backup device for the full database backup.
-- Comment this line if device already exist.
EXEC
sp_addumpdevice
'disk', @backupDevice, @backupFile
-- Back up the full database (This can take long time to run).
-- INIT - New backup file will be created or overwritten if already exist.
-- STATS - Displays a message
each time another percentage completes, and is used to gauge progress.
-- You need to run BACKUP command outside EXEC statement to see STATS. ERT: 50 min.
EXEC('USE master BACKUP DATABASE '+@databaseName+' TO '+@backupDevice+' WITH INIT, STATS = 10')
-- Drop backup device if necessary.
IF
EXISTS (SELECT * FROM
master.dbo.sysdevices
WHERE [name] =
@backupDevice)
EXEC sp_dropdevice @backupDevice
Alternative Methods: Click here to expand...
Method 2: Do Normal Backup with Microsoft SQL Enterprise Manager:
-
[Start] -> Programs -> Microsoft SQL Server -> Enterprise Manager
- Expand
tree and select your database.
- From menu choose: Action -> All tasks -> Backup Database...
Method 3: Do File Backup by making copy of *.MDF and *.LDF files.
This method is faster but there are two disadvantages and must be used only for
fast backups:
- Database needs to be taken offline so files will be not modified in the copying
process. You can take database offline with this command:
-- Bring the database down.
EXEC sp_dboption 'PinnacleCSS', 'offline',
'TRUE'
- This will brake clustering – physical ordering of data around index on hard drive.
To reorder data again there is command "DBCC CHECKALLOC" but this action
is time consuming.
Make copy of backup files somewhere safe.
2. Check database consistency and integrity
Check Database
Note: you can do this with "Microsoft SQL Enterprise Manager",
by selecting your database, choosing ' Database Maintenance Planner...' and completing
wizard to do automatic repair, optimization and backup of database.
Note: We will use NOINDEX option which specifies that nonclustered indexes for user
tables should not be checked. This will decreases the overall execution time. NOINDEX
has no effect on system tables, because DBCC CHECKDB always checks all system table
indexes. Without this option the DBCC CHECKDB command can take a lot of resources
and long time to run. Please check that database name is correct inside this
script:
-- Declare
Database name to work with.
DECLARE @databaseName
sysname SET @databaseName = db_name()
-- Checks the
integrity of the data, index, text, ntext, and image pages for all tables and indexed
views.
-- Checks the consistency of disk space allocation structures for a specified database.
-- NO_INFOMSGS - Suppresses all informational messages. This option will reduce
processing and tempdb usage significantly.
-- ESTIMATEONLY - Displays the estimated amount of tempdb space needed to run.
DBCC CHECKDB (@databaseName, NOINDEX)
WITH NO_INFOMSGS, ESTIMATEONLY
-- Allow updates to
the system tables
EXEC
sp_configure
'allow updates',1
GO
RECONFIGURE WITH OVERRIDE
GO
-- Declare Database name to work with.
DECLARE @databaseName
sysname SET
@databaseName = db_name()
-- NOINDEX - Specifies that nonclustered indexes for nonsystem tables should not
be checked.
DBCC CHECKDB (@databaseName, NOINDEX) WITH NO_INFOMSGS
-- REPAIR_REBUILD - Safely
repair database without data loss. ERT: 1 hour 20 min.
-- DBCC CHECKDB ('PinnacleCSS',
REPAIR_REBUILD) WITH NO_INFOMSGS
-- Disallow updates to the system tables
EXEC
sp_configure
'allow updates',0
GO
RECONFIGURE WITH OVERRIDE
GO
Check Constraints and Consistency
-- Declare Database name to work with.
DECLARE @databaseName
sysname SET @databaseName = db_name()
-- Check all enabled and disabled constraints
on all tables. ERT: 1min.
DBCC CHECKCONSTRAINTS WITH ALL_CONSTRAINTS
-- Check consistency
in and between system tables of a specified database.
DBCC CHECKCATALOG
(@databaseName)
Note: DBCC CHECKCATALOG much like DBCC CHECKCONSTRAINTS this command does not check
the integrity of the page allocations; rather it checks data in the system tables.
DBCC CHECKCATALOG reporting errors mean that someone manually added, modified or
removed records from system tables. If you're not aware of such activity you should
tighten up your security – examine who has system administrator and database owner
privileges and evaluate your security policy.
3. Prepare for batch operations
Change Recovery Mode to BULK_LOGGED
To save time with all batch operations on database we can switch to to BULK_LOGGED
recovery mode:
-- Declare Database name to work with.

				DECLARE @databaseName
				sysname SET
					@databaseName = db_name()

				-- If current recovery mode is FULL then...

					-- Set recovery mode to Bulk_Logged. Users CAN be actively

					-- processing in the DB when the Recovery Model is changed this may

					-- or may not be desired? Adding the "terminate" clause DOES NOT

					-- affect current users if ONLY the recovery model is changed.

					-- Note: Please switch database to SINGLE_USER mode before.

				IF DATABASEPROPERTYEX(@databaseName,'Recovery')
				= 'FULL'

				EXEC('ALTER DATABASE '+@databaseName+' SET RECOVERY BULK_LOGGED')

				-- Show current recovery mode.

				SELECT DATABASEPROPERTYEX(@databaseName, 'Recovery')
4. Updates and Batch Operations
Perform all you batch operations here
5. Improve Performance: Rebuild Indexes
Rebuild Indexes
How often you remove fragmentation depends on the level of data modifications within
your database. Systems that handle millions of transactions daily should have indexes
rebuilt at least every week. On the other hand, databases that see few changes each
week may perform fine even if you only rebuild indexes once each month.
-- Declare Database name to work with.
DECLARE @databaseName
sysname SET
@databaseName = db_name()
-- Script to automatically
re-index all tables in a database. ERT: 4 min.
DECLARE
@TableName sysname
DECLARE TableCursor CURSOR FOR
SELECT [table_name] FROM [information_schema].[tables]
WHERE [table_type] =
'base table'
OPEN TableCursor
FETCH NEXT FROM TableCursor INTO @TableName
WHILE @@FETCH_STATUS =
0
BEGIN
SELECT @TableName AS 'Reindexig Table'
-- Do reindexing
of table.
DBCC DBREINDEX (@TableName)
FETCH NEXT FROM TableCursor INTO
@TableName
END
CLOSE TableCursor
DEALLOCATE TableCursor
You can use DBCC INDEXDEFRAG. This statement allows indexes enforcing PRIMARY KEY
and UNIQUE constraints to be rebuilt without dropping constraints. Not having to
know index types and names can be useful as well. You can rebuild individual index
by using: DBCC DBREINDEX (@databaseName,@tableName,@indexName) command or by dropping
and recreating them with DROP INDEX and CREATE INDEX statements. Keep in mind that
rebuilding the clustered index also causes all nonclustered indexes to be rebuilt.
DBCC DBREINDEX can be considerably faster than running DBCC INDEXDEFRAG on very
fragmented indexes.
Unlike DBCC DBREINDEX, DBCC INDEXDEFRAG is an online operation, so it does not hold
long-term locks that can block running queries or updates. DBCC INDEXDEFRAG can
be considerably faster than running DBCC DBREINDEX on less fragmented indexes. DBCC
INDEXDEFRAG will not help if two indexes are interleaved on the disk because INDEXDEFRAG
shuffles the pages in place. To improve the clustering of pages, rebuild the index
with DBCC DBREINDEX.
6. Improve Performance: Update statistics
Update Statistics
Statistics contain information about the distribution of values within a particular
index or columns of a table. If you have a performance issue with a query, the very
first step you should take before analyzing it is to update the statistics. By default
SQL Server 2000 updates statistics automatically on every table. However, in some
cases it makes sense to turn off automatic statistics' updates. For example, let's
suppose you have some sort of batch-processing routine that adds millions of rows
to your table on weekends, when the system usage is minimal. Automatic statistics'
updating will simply slow your batch process and provide no benefit to the system.
Instead you can turn off the automatic updates for the weekend and update statistics
on that table first thing Monday morning. You can enable or disable automatic statistics'
updates using sp_autostats procedure.
-- A CREATE STATISTICS statement is
executed for each column that satisfies the above restrictions.
-- Creates single-column statistics for all eligible columns for all user tables
in the current database.
-- Columns already having statistics are not touched.
-- FULLSCAN - force every row in the table or index to be fully examined and used
to build the column statistics.
EXEC
sp_createstats
'FULLSCAN'
-- Runs UPDATE STATISTICS against all user-defined tables in the current database.
EXEC
sp_updatestats
Note: FULLSCAN option can increase the time it takes to update the statistics, which
could hurt performance elsewhere on your server, especially if the table is huge.
You can use DBCC SHOW_STATISTICS (@tableName,@columnName) or EXEC sp_statistics
@tableName to see statistic for individual table.
7. Improve Performance: Report on space utilization
Verify File Sizes
You can get information about files by using this command:
-- Get name and size of the
files.
EXEC sp_helpfile
Reclaim Empty Space
This script reclaims empty space from all tables of your database. This space occurs
after a column is dropped from the database using the ALTER TABLE DROP COLUMN statement.
DBCC CLEANTABLE works for variable-length columns only. Variable-length columns
are columns of type varchar, text, nvarchar, ntext, varbinary, and image.
NOTE: This script needs "Microsoft SQL Server Service Pack 4"
-- Declare Database name to
work with.
DECLARE @databaseName
sysname SET
@databaseName = db_name()
-- Script to automatically
table space after a column is dropped from the database. ERT: 4 min.
DECLARE
@TableName sysname
DECLARE TableCursor CURSOR LOCAL FAST_FORWARD READ_ONLY FOR
SELECT [name] from dbo.sysobjects WHERE [xtype]
= 'U' ORDER BY [name]
OPEN TableCursor
FETCH NEXT FROM TableCursor INTO
@TableName
WHILE @@FETCH_STATUS =
0
BEGIN
SELECT @TableName AS 'Reclaim Space from Table'
-- Reclaim
space from table.
DBCC CLEANTABLE (@databaseName, @TableName)
FETCH NEXT FROM TableCursor INTO
@TableName
END
CLOSE TableCursor
DEALLOCATE TableCursor
Shrink Database File
Note: The DBCC SHRINKDATABASE command can take a lot of resources and long time
to run!
-- Declare Database name to work with.
DECLARE @databaseName
sysname SET @databaseName = db_name()
-- Show space used by
database
EXEC sp_spaceused
-- Shrink the size of
the data files in the database. ERT: 50 min.
DBCC SHRINKDATABASE
(@databaseName)
-- Reports and corrects inaccuracies
in the sysindexes table,
-- which may result in incorrect space usage reports by the sp_spaceused system
stored procedure.
DBCC UPDATEUSAGE
(@databaseName)
Note: You can use DBCC SHRINKFILE command to shrink separate files. The sysindexes
table can become inaccurate over time, especially in databases that grow frequently
and/or shrink frequently. It's a good idea to execute DBCC UPDATEUSAGE after each
time you shrink database files, or as a regularly scheduled maintenance task.
Shrink Log File
Log file is split into separate Virtual Log File (VLF's) inside. With reasonable
backups log file should take 10-20% of database size, contain less than 50 VLF's
and must be no larger than 1GB.
LOG file contains active and inactive portion. Active portion of the
transaction log contains transactions that are still running and have not yet completed.
Inactive portion contains completed transactions and so is no longer used during
the recovery process. You can check amount of VLF's with command:
-- Get information about LOG file.
Number of rows = number of VLFs.
DBCC LOGINFO
Method 1 (recommended): backup and truncating.
-- Step 1 (optional)
If you had some activity in database after last backup then
-- you need to make differential backup before truncating log
-- Declare Database name to work with.
DECLARE @databaseName
sysname SET
@databaseName = db_name()
-- Declare backup device
and file.
DECLARE @backupDevice sysname SET
@backupDevice
=
@databaseName+'_dev_diff'
DECLARE @backupFile sysname SET @backupFile
=
'D:\[BACKUP]\'+@databaseName+'-20060224-1200_diff.bak'
-- Drop backup device if necessary.
IF EXISTS
(SELECT * FROM master.dbo.sysdevices WHERE [name]
= @backupDevice)
EXEC sp_dropdevice @backupDevice
-- Create a logical
backup device for the differential database backup.
-- Comment this line if device already exist.
EXEC
sp_addumpdevice
'disk',
@backupDevice,
@backupFile
-- Perform differential database backup (reserved for later).
-- NOINIT - Indicate that backup set is appended to some existing backup sets.
EXEC('USE
master BACKUP DATABASE '+@databaseName+' TO
'+@backupDevice+' WITH NOINIT, DIFFERENTIAL')
-- Drop backup device if necessary.
IF
EXISTS (SELECT * FROM
master.dbo.sysdevices
WHERE [name] =
@backupDevice)
EXEC sp_dropdevice @backupDevice
-- Step 2 - Truncate log.
-- Declare Database name to work with.
DECLARE @databaseName
sysname SET
@databaseName = db_name()
-- Truncate inactive part of transaction log manually.
-- TRUNCATE_ONLY - removes the inactive part of the log without making a backup
copy of it and truncates the log.
BACKUP LOG @databaseName WITH TRUNCATE_ONLY
-- Shrink Log file to as small
a size as possible.
EXEC('DBCC SHRINKFILE
('+@databaseName+'_Log, TRUNCATEONLY)')
-- Set size of log file to appropriate (Size in MB).
EXEC
('ALTER DATABASE '+@databaseName+' MODIFY FILE (Name = '''+@databaseName+'_Log'',SIZE
= 20)')
Note: TRUNCATE_ONLY - This option frees space. Specifying a backup device
is unnecessary because the log backup is not saved. SQL Server reuses this truncated,
inactive space in the transaction log instead of allowing the transaction log to
continue to grow and use more space. It breaks the log backup chain so changes recorded
in the log are not recoverable. For recovery purposes, immediately do full Database
backup or execute BACKUP DATABASE as soon as possible.
BACKUP LOG with TRUNCATE_ONLY no longer breaks the continuity
of the transaction log in SQL Server 2005. In fact, BOTH the TRUNCATE_ONLY and the
NO_LOG options have been changed to ONLY perform a CHECKPOINT. In a database running
in the FULL or BULK_LOGGED Recovery Model, this will have NO real impact on the
transaction log. In a database running in the SIMPLE Recovery Model, this will execute
a checkpoint and the database setting of simple truncates the inactive portion of
the transaction log when a checkpoint occurs.
Alternative Methods: Click here to expand...
Method 2: Here's other way to shrink your logs that is guaranteed to work
every time. This trick won’t work if the database has more than one log file. First,
make sure that you have back up of the database.
- Bring the database down and detach it:
-- Declare Database name to work with.
DECLARE @databaseName sysname
SET @databaseName = 'PinnacleCSS'
-- You must be in the [master] database
to run DBCC DBCONTROL.
USE master
-- Bring the database down.
EXEC sp_dboption @databaseName,
'offline',
'TRUE'
-- Detach database.
EXEC sp_detach_db @databaseName
- Rename the log file (*.LDF). The old log file can be kept until the database is
reattached successfully. This provides a backup plan if for some reason SQL server
fails to attach the database without the old log file.
- Reattach database without providing the old log file location from within the sp_attach_db
command. This will create a new log file with default size i.e. 512 KB. If log file
was placed in wrong location then proceed to step 4.
-- Declare Database name to
work with.
DECLARE @databaseName sysname
DECLARE @fileData sysname
DECLARE @fileLogs sysname
SET @databaseName = 'PinnacleCSS'
SET @fileData = 'D:\MSSQL2000\MSSQL\Data\PinnacleCSS_Data.MDF'
SET @fileLogs
= 'D:\MSSQL2000\MSSQL\Data\PinnacleCSS_Log.LDF'
-- You must be in the [master]
database to run DBCC DBCONTROL.
USE
master
-- Attach database without
providing the old log file location.
EXEC sp_attach_db @databaseName,
@fileData
-- Put database into single
user mode mode.
EXEC
sp_dboption @databaseName, 'single user',
'TRUE'
-- Bring the database up.
EXEC
sp_dboption @databaseName, 'offline',
'FALSE'
- Bring database down and detach it (use script from step 1).
- Move log (*.LDF) file to location you want.
- Reattach database but now add location to LOG file (use script from step 3).:
...
EXEC sp_attach_db
@databaseName,
@fileData, @fileLogs
...
8. Final steps
Change Recovery Mode back to FULL
After all actions we need to set Recovery Model back to Full.
-- Declare Database name to
work with.
DECLARE @databaseName
sysname SET
@databaseName = db_name()
-- If current
recovery mode is Bulk_Logged then...
-- Set recovery mode to FULL.
IF DATABASEPROPERTYEX(@databaseName, 'Recovery') =
'BULK_LOGGED'
EXEC('ALTER
DATABASE '+@databaseName+' SET RECOVERY FULL')
-- Show current recovery mode.
SELECT DATABASEPROPERTYEX(@databaseName, 'Recovery')
Backup Database LOG
Now we need to backup all our changes and drop device we created when we performed
first FULL DATABASE backup.
-- Declare Database name to work with.
DECLARE @databaseName
sysname SET
@databaseName = db_name()
-- Declare backup device and
file.
DECLARE
@backupDevice
sysname SET
@backupDevice
= @databaseName+'_dev_log'
DECLARE
@backupFile
sysname SET
@backupFile = 'D:\[BACKUP]\'+@databaseName+'-20060224-1200_log.bak'
-- Drop backup device if necessary.
IF EXISTS
(SELECT * FROM master.dbo.sysdevices WHERE [name]
= @backupDevice)
EXEC sp_dropdevice @backupDevice
-- Create a logical
backup device for the differential database backup.
-- Comment this line if device already exist.
EXEC
sp_addumpdevice
'disk',
@backupDevice, @backupFile
-- Perform a
Log backup (remember this might be VERY large).
-- NOINIT - Indicate that
backup set is appended to some existing backup sets.
EXEC('USE master BACKUP LOG '+@databaseName+' TO
'+@backupDevice+' WITH NOINIT, STATS = 10')
-- Drop backup device if necessary.
IF
EXISTS (SELECT * FROM
master.dbo.sysdevices
WHERE [name] =
@backupDevice)
EXEC sp_dropdevice @backupDevice
Remove Single User Restrictions from Database
-- Declare Database name to work with.
DECLARE @databaseName
sysname SET
@databaseName = db_name()
-- Remove
single user restrictions.
EXEC('ALTER
DATABASE '+@databaseName+' SET MULTI_USER')
SQL Server 2000 SP3 Security Features and Best Practices: Security Best Practices
Checklist:
http://www.microsoft.com/technet/prodtechnol/sql/2000/maintain/sp3sec04.mspx
Done.